composting
Corrugated iron
compost bins
If you have the time
and materials to build a set of three compost bins then the simplest
and cheapest way is to build it out of corrugated iron.
Not only are they cheaper to build than bins
made only of wood but the corrugated iron sides last longer than wooden
sided bins as the iron sheets are more durable. They also take less
time to build as whole sections are covered with a single sheet. The
only disadvantage of corrugated iron bins is that they still take a fair
effort to build and therefore are not as easy to move around as
Plastic
or
Chicken Wire compost bins. Guidelines for building a set of three
corrugated iron bins are as follows:A. size of the bins
The first thing to do is to decide how big you want
your bins to be. This will largely depend on how much compostable
material your garden generates. For more information on compost bin size
see
Size
Of compost Bins. For this example we will set the size of the
bins at one metre by one metre (40 x 40 inches). This size is suitable for
a medium to large garden. B. digging the postholes
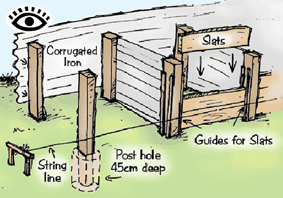
Dig eight post holes in two rows. The holes should
be forty five centimetres (18 inches) deep and one metre (40 inches) apart,
measuring from the centre of each hole. C. Putting in
the posts
Place eight 1.5 metre (5ft) posts upright
in the holes. Either fill with a fairly dry concrete mix or
with earth and tamp down with a crowbar to make the posts firm.
As you are filling the holes use a spirit level and string line
to keep the posts vertical and in a straight line. Make sure
that the distance between each post is the same, so that the
wooden slats used at the front can be interchangeable with any
of the bins. The best type of posts to use are rot resistant hardwoods. In Australia the ideal posts are
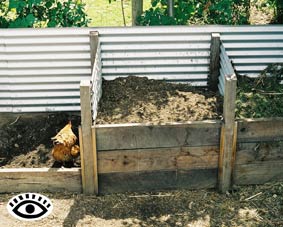
Three stage corrugated iron compost bin with removable wooden slats at the front.
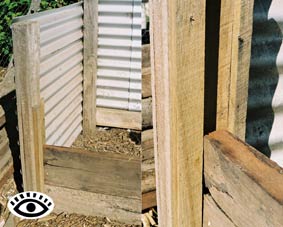
Corner section of one bin and a close up of a guide for the removable slats.
d. attaching the sides
Cut lengths of corrugated iron to fit the rear
and sides of the bins and attach with nails or screws. Note that it is
better to leave the posts to settle in the ground for a day or two
before attaching the corrugated iron. E. cutting the slats
Measure the distance between the front posts.
(the
distances should be the same) and cut nine 50mm by 200mm pieces of wood
ten millimetres (1/2 Inch) smaller than the distance between the posts. f. guides for the slats
To hold the slats in place at the front of the
compost bin screw two thin strips of wood or angle iron to the inside
sides of the front posts. They should be slightly wider (suggest
5 mm (1/4 ")
wider) than the width of the slats, so they can slide in and out easily.
The guides only have to be the height of the three slats stacked on top
of each other and not the full height of the posts.
WARNING Galvanised iron
will leach zinc into the soil as the iron slowly oxidises when in
contact with compost or soil. If you are at all concerned about this
happening then do not use galvanised iron. An alternative
would be to use hardwood plinth board 15 cm wide by 2.5 cm thick.
