

vegetable patch design
building a wooden raised bed
frame
building a raised wooden bed frame
Building a raised vegetable bed frame
is a pretty simple exercise, but for those unsure about how to
go about building one below is a step by step guide on how to
build a wooden raised bed frame.
equipment
- 4.5 or 5 mm drill bit
Preferably long but the standard length is OK. - Hex screw bit
Only if using bugle baton screws. - 90 deg angle clamp Drill.
1 is adequate but two makes things a little easier. - Power drill
- Circular saw
- Set square.
materials
- 100 mm Bugle baton screws or 125 mm
galvanised bullet head nails
Other types of screws can be used but I have found bugle baton screws to be ideal as they are robust enough not to break under tension and sit flush with the timber, no unsightly knobs.
- 4 200 X 50 mm lengths of treated of pine, Redgum,
Sugar gum or Jarrah
The lengths of the timber will depend on what shape and size raised bed you want.

TOP : long drill bit.
CENTRE : standard 5 mm drill bit.
BOTTOM : Hex bit designed to screw in bugle baton screws.
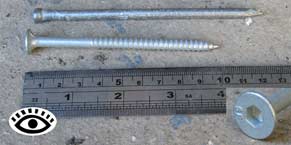
TOP : 125 MM galvanised bullet head nail.
BOTTOM : 100 mm bugle baton screw.
BOTTOM RIGHT : Bugle baton screw head.
-
construction

Two pieces of the timber frame clamed together to form a right angle.

Drilling a pilot hole for a screw to be inserted.

Screwing in a 100 mm bugle baton screw.

Bugle baton screw securing the two ends together. You will need to put two screws into each edge to secure the frame properly.
Two pieces of the timber frame clamed together to form a right angle.
Drilling a pilot hole for a screw to be inserted.
Screwing in a 100 mm bugle baton screw.
Bugle baton screw securing the two ends together. You will need to put two screws into each edge to secure the frame properly.
- Cut the timber to your required length and width.
Use a set square to make sure the cuts are exactly 90
degrees.
- Clamp a length and a width piece together so they form a
right angle.
If your completed frame will be light enough to transport then it is best to build it on a flat surface, such as a garage floor, and then moved to were you want the raised bed to go.
- Drill two pilot holes then nail or screw the two ends
together.
Technically you don't have to drill pilot drill holes into treated pine as it is a soft wood, however it does make the process of drilling or screwing easier and reduces the risk of splitting the timber or running your screws or nails in on an angle. If you are using Redgum or Jarrah then definitely drill pilot holes.
- Repeat steps 2. and 3. for the next three corners until you have a completed frame.
general notes
As none
of the beds are very long I prefer to make my frames on the flat garage
floor then move them as a single piece to where I want them to go.If you want to make a bed higher than 200 mm then simply make two identical frames and nail the together as I have described on the Wooden Wicking Bed - Page 1 webpage.